Tengu clone on PCB

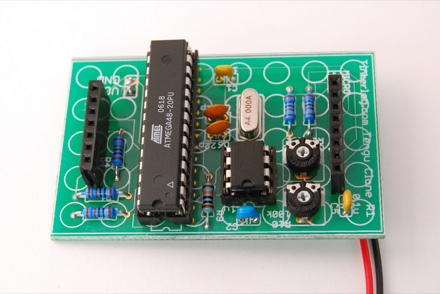
This is a new version of my Tengu clone. This time on a printed circuit board (PCB). I have them produced by Olimex and I am very pleased with the quality. The PCB worked on the first try and has some minor issues only.
Materials

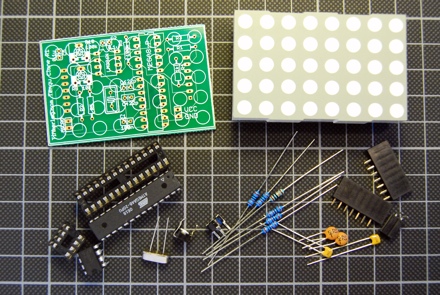
- Tengu PCB
- Everlight 8*5 LED dot matrix
- ATmega48, 4kB Flash RAM, 512 bytes RAM
- 4 MHz crystal
- LM386 Op-Amp
- 28 pin header
- 8 pin header
- 2 * 22pF capacitors
- 3 * 100nF capacitors
- 10k potentiometer
- 100k potentiometer
- 100k resistor
- 5 * 1k resistors
- 2 * 7 pin header sockets
- 2 pin headers for power supply and microphone (optional)
- Electret microphone (not on the picture)
Note, that the electret microphone has a polarity. On the PCB the inner pin is the positive one. If you connect it the wrong way, it is heating up really quick.
The microphone that I used here has an impedance of 2k. You may have to experiement a bit with different microphones.
The capacitor C2 is used to control the amplification of the LM386. I used 0.1uF but you can use up to 10uF to get a stronger amplification. Here is the amplifier circuit that I used.
PCB design issues

As this is my first design, there are a couple of things that I would redesign.
As I tried to insert the pin header sockets, I realized that the drill holes were a bit too narrow. You have to use a bit of strength to insert the headers, but it works.
All solder pads used for resistors and capacitors are a bit too small. It was a bit difficult to solder them. I would make them a larger next time.
I think I should use a bit less of the silk layer. Some solder pads are covered with silk. Most of the time that does not hurt as it is on the top side. But there are pins that you may wont to solder on the top side, e.g. the power connector.
Improvements
The component count could be reduced if I had dropped crystal. For the animation of the LED matrix the internal oscillator would be sufficient. On the other hand, with a suited crystal, this circuit could be modified to display the time.
I would add an ISP (in system programming) header for easier programming. Now you have to flip off the display, take out the controller, program it, re-insert it and put the display back in place. Not a fast turn around if you want to modify the firmware.
What would you think of an Arduino version of this circuit? The controller could be replaced with an Arduino compatible ATmega168. Or maybe as an Arduino shield?
Conclusion
It is great to see your first produced PCB. Even better if it works on the first try. Maybe I can even build a kit out of it with the next revision of the board.
As I have still two boards left, you can email me at alex at this domain and I will send you the PCB for free. The only requirement would be, that you really want to build it and that you give me feedback on how it worked, what you would change or how you modded it.
Links and Downloads
- Crispin Jones Tengu, the original idea of this device
- Mini Amplifier with LM386
- Tengu clone on prototype board
- Tengu clone on a breadboard
- tengu-clone-rev-1.0a.zip source and Eagle schematics


Sem comentários:
Enviar um comentário